By: Mike Osadciw
This article was originally published for Secrets of Home Theater and High Fidelity and is reprinted here with permission.
The EluneVision Reference Studio 4K NanoEdge screen is designed with a thin frame for performance and luxury. As a near-perfect Lambertian diffuser with zero surface texture, the finest details of the 4K home video format will be seen at all seats. The EluneVision Reference Studio 4K breaks the price-performance barrier for a high-resolution screen and the LED backlighting increases the cool factor and the modern touch.
The NanoEdge frame is available in many sizes and in both 16:9 and 2.35:1 aspect ratios and guarantees neutral colour balance without colour shifting. Whatever is projected onto the EluneVision Reference Studio 4K will be what is returned to the viewer’s eyes. A reference home theater screen should be designed to watch the most from your movies and the least of the screen – and that’s precisely what the EluneVision Reference 4K delivers.
Highlights
EluneVision Reference 4K Reference Studio 4K NanoEdge
- Accurate grayscale and colours
- Virtually invisible surface texture optimized for 4K
- Even light diffusion at every angle
- Ultra-thin black bezel with light absorbing fabric
- Integrated LED backlighting for mood and décor
- Available in 1.78:1 (16:9) and 2.35:1 aspect ratios
- Rigid frame design
Introduction
I’m very familiar with EluneVision as I’ve calibrated many of my clients’ video systems with their Reference Studio 4K material. While their frame options widely vary, the material always delivered excellent results with a good projector by not adding any noticeable change to the projected image. Large frames can be very suitable to dedicated home theaters, but I’m drawn EluneVision’s thin frame NanoEdge LED because my room doubles as a general-purpose living room.
ELUNEVISION NANOEDGE SCREEN SPECIFICATIONS
Product model: EV-ZL-133-1.0-2.35
Screen Sizes (16:9): 92”-180”
Screen Sizes (2.35:1): 120”-165”
Larger Screen Sizes Available for Custom Order: Yes
Screen Gain: 1.0
Texture: None
Viewing Angle: 180o
Viewable Width: 122.25”
Viewable Height: 52”
Frame Width: 123.25”
Frame Height: 53”
Bezel Size: 3/8”
Additional Connection: 120v power supply for LED
Weight:
Warranty:
MSRP:
Company: EluneVision
URL: www.elunevision.com
Linkbacks:
EluneVision Interview
I remember the excitement when digital projectors broke into the mainstream in the early 2000s. The idea of large screen home theater slowly moved out of the elite category and became more accessible to consumers. During this time, new screen companies tried to cash in on the explosive home theater sales. Many of those companies have come and are now gone while the three well established screen companies remained a constant. It was difficult for these new low-cost companies to achieve the same level of quality while being a third (or even less) of the price. Inconsistencies in manufacturing, cheap design, and being a new company trying to establish itself in an increasingly competitive market made smart consumers and dealers view them as a risk. But time moves on, technology improves, and screen companies like EluneVision has risen to the challenge to prove there’s room in the market for high performance screens without the high price. With a large array of designs and screen surfaces and with installations in many premium locations, EluneVision is not your fly by night screen sensation. Reviewed here is the EluneVision Reference Studio 4K NanoEdge Screen in the 133” 2.35:1 size. I’ve had many screens cross my path over the years and this one is absolutely worth a closer look.
Design
The screen chosen for this review has a 2.35:1 aspect ratio and a 133” diagonal measurement. It provides a 10-foot viewing width in 2.35:1 and an 8-foot width in 1.78:1 (16:9) which translates to about a 110” diagonal screen in this ratio. I prefer the 2.35:1 screen width. This ratio gives the width that’s intended extending beyond the 1.78:1/1.85:1 images we’re used to viewing. Movie theaters don’t show movies this way since they’re all constant width. To view this in the home sets the screen apart from conventional TV width.
The Reference Studio 4K material used in this NanoEdge LED screen is a 1.0 gain screen. Advertised as a perfect Lambertian diffuser, a 1.0 gain screen will deliver whatever is projected to the screen back to your eye unaltered. It shouldn’t drop or increase the reflected light, nor should it alter grayscale, colour, or viewing angle. Negative gain screens are tinted gray to help deliver better black levels for high output projectors. High gain screens are used to compete with ambient light in the room and can be either white-ish, dark gray, or even almost black. These screens give the image a glossy appearance with the addition of sparkles, create hot spotting (brighter centre, dimmer edges), alter viewing angles, and alter grayscale and colour from mild amounts to severe. While those sorts of screens are designed for a specific purpose, the more severe the colour alteration, the more calibration work that needs to be done to the projector just to get the image closer to correct. With a well-designed white 1.0 gain screen, you know you’re buying into high fidelity images with controlled room lighting.
The viewable frame, or bezel, on the EluneVision NanoEdge is no more than a narrow 3/8” wide. It’s flush to the screen to not create shadows and is covered with light-absorbing fabric to catch spillover from centering the projector’s light to the screen. The NanoEdge requires accurate projector alignment during installation since there’s little forgiveness by the screen’s bezel to catch that stray light. Less than ideal projector installations may require more frame for the light to spill into due to horizontal or vertical keystone or tilt. I never recommend electronically manipulating the signal to fix these install issues because of the digital artefacts created due to rescaling the image. If you know your projector will be mounted awkwardly in a DIY sort of way, then EluneVision has two other fixed frame models with thicker bezel options. Otherwise, the NanoEdge will look brilliant with a professional projector install.
The white Reference Studio 4K material is thin, resilient, and has virtually no surface texture. It’s also white on the opposite side of the screen and there is a label that tells what side to use during installation. EluneVision provides light absorbing fabric to install directly behind the screen to prevent light from passing through. Behind the bezel is the LED strip that creates a halo of light. That means this screen needs to be plugged in, so you’ll need a nearby outlet or some prewiring done behind the wall to keep it hidden.
I use the LED as a backlight when I watch programs when I need some light in the room. Backlighting is used in post-production and is the preferred method because most of the light stays off the screen’s surface. The Reference Studio 4K screen has a gain of 1.0 for best image quality so room lighting directly on the screen isn’t recommended. The supplied remote gives a multitude of fixed LED colour options and white. If I need light in the room, I find that the colour I choose is based on my mood or the video I choose. I can also roll or flash between colours although unless I was hosting a rave in my home or wanting to give my guests a seizure I wouldn’t be using the flashing LED option. I prefer setting a slow-moving roll between colours when I listen to music and when the projector isn’t in use. When I have invited guests, the light is bright enough to be able to use the LEDs as one of my room’s lights. In combination with other lights in the room, it’s a welcomed addition because when the screen is not in use, the LEDs changes the perspective of this massive screen on the wall to being part of the room’s lighting and décor. It’s an easy sell to your home’s interior designer, be it your spouse or hired help.
Setup
Picking up the screen from your local dealer is easy as all you need to do is make sure the box dimensions fit your method of transport. But if you live in a remote area of the USA or Canada where local dealers simply don’t exist, you’ll be relying on shipping directly to your address from your EluneVision dealer of choice. Rest assured, the NanoEdge screen is shipped in a long carboard box that is well-padded for the wild ride of shipping. Taking the box apart is straight forward and I took precaution to not be too hasty at tearing any part of the package open. Since I didn’t know what the packing inside was like, I didn’t want any accidental pokes into the screen. Once any screen has a mark on it, you’d have to live with it or replace it with another screen at your own expense. Thankfully the EluneVision is wrapped very nicely inside to prevent these sorts of accidents.
For correct screen installation you’ll need plenty of flat floorspace to lay the screen down on its face with the supplied protection. It’s recommended you clear out the area in the room as large as the screen itself and then have plenty of room to walk around it to fix the screen to the frame. Stepping on the screen due to a loss of balance would be tragic. Remove any raised or pattern-textured area rug just to be safe.
The instructions are easy to follow although sometimes the English translation isn’t always optimal. There were a few moments when I questioned a step. I also came across an image of the center stabilizing rod in the manual didn’t match the actual part in the box, so I had to be a bit creative to figure it out. When I spoke to EluneVision about it, I was told that the newer part was more optimal for screen stability when compared to the original part used when the manual was written. Let’s hope the manual will be upgraded to reflect the change.
The screen comes with a kit with all tools needed for assembly including white gloves that you’ll need to wear when assembling the screen to the frame. Don’t get your skin’s oils on the screen or else it could be difficult to clean off. I’d also recommend wearing safety goggles for you and your helper when installing this screen. They don’t come in the package, but since this screen uses metal tensioner springs, I’ve seen one of these things fly if you accidentally let go of it and the last place you want it is heading straight for your eye. At that point, 4K video will be the last thing you’ll be thinking about.
The frame is much like an iceberg. There’s very little showing on the outside where the screen is since it’s the NanoEdge with the ultra-thin bezel covered in light-absorbing fabric. The rest of the frame is hiding under the screen and it’s quite wide and stable. While the frame is easy to put together, the tensioning system isn’t; the screen is curled over with a rod inserted through the outside edges. It is here where the frame and springs pull it tight. I found it time consuming to make it fit. I’m sure I could get it done faster the second time around, but this is a one time install for home theater owners. I’d be more than happy to spend a few more dollars and have my retailer’s installer put it together right and just enjoy it when hung on the wall! The LED backlight system is already attached to the frame and just the power module needs to be put in place. No problem there. After some careful consideration on the height of the screen from the floor, the metal bracket was installed, and the screen was easy to hang.
In Use
It’s extremely important to calibrate the projector to the screen. After grayscale and colour were set, I mostly watched 4K content because I wanted to watch the best source material for light and colour with the use of HDR. No matter what I watched, I felt confident that the NanoEdge Reference Studio 4K was showing me exactly what the projector was outputting. Just as advertised, I didn’t see any texture on the screen from my viewing distance of 12 feet. The screen also looked great from every angle; it didn’t matter where any of my guests were sitting, we all saw the exact same picture. That’s the advantage of the 1.0 gain screen. An increase in gain may make the picture brighter, but it will decrease viewing angle and increase hot spotting. I used a JVC DLA-X550 for this review and an Oppo UDP-203 connected with a Monster HD1000 HDMI cable.
4K UHD
I started off with some classic films on UHD 4K Blu-ray. Blade Runner looked stunning just as all reviews pointed to. The screen’s even light distribution and zero texture revealed the texture of the film as best as possible through the JVC e-shift projector. If you want to know what good film looks like in the home at a great price, look no further. EluneVision’s Reference Studio 4K NanoEdge delivers beautiful 4K films into your home just as if I had a 35mm film projector behind me. The subtle shades in the dark, dreary environments in Blade Runner were easily seen. The contrast between the dark images of buildings on the streets to their bright signs created a mind-blowing sense of depth with a film of this age. The EluneVision Reference 4K demonstrates how a great transfer of an older film can bring cinematic magic into the home.
I also put in Close Encounters of the Third Kind and spotted similar benefits. This UltraHD Blu-ray disc is brighter and like Blade Runner, fills the full 2.35:1 portion of the screen. The colours from the lights of the space ships, especially during the final act of the film, proved that the Reference Studio 4K was up to the task of taking brightness and colour up a notch. So far so good. Let’s push this screen a little newer content.
A favourite UltraHD Blu-ray reference is Planet Earth II. The HDR application and native resolution in most scenes is superbly realistic. I’ve never seen so much colour – and bright realistic colours that aren’t over the top – on home video before. The aspect ratio of this program is 1.78:1 so there was about a foot on each side of the screen that was unused. The screen’s high resolution let me see all the detail that the JVC could deliver to the screen; from the magnificent full 4K captures to the subtle compression artefacts and softness inherent to some drone cameras, this screen showed it all. Every friend I brought in to view this program dropped their jaw to the floor when viewing these remarkable images. My guess is that you’ll want to treat yourself, family, and friends to the same viewing experience.
On the Bench
A review is not complete without some bench tests. The strategy I chose was to measure the EluneVision Reference Studio 4K to a screen that’s considered to be the industry standard for a 1.0 gain screen, which is the Stewart StudioTek 100 at three times the price. For these tests, the JVC projector was calibrated to my 12”x14” sample of the Stewart StudioTek 100 mounted directly overtop the EluneVision screen. The projector was calibrated for D65 grayscale and BT.709 colour, and somewhat close to 2.4 gamma off the Stewart. Once those measurements had been made and calibrated to the projector, the Stewart sample was removed off the EluneVision screen and the same sets of patterns were measured without touching any of the controls on the JVC. This allowed me to see the measurable differences, no matter how unmeaningful to our eyes, in a controlled sequence.
The projector was 16 feet from the screen and the measurements were taken from the 16:9 110” screen size. The reference measuring instrument was the Konica-Minolta CS-1000A spectroradiometer and a Murideo SIX-G pattern generator, both connected to CalMan calibration software set to measure HD BT.709 with a reference white of 120cd/m2.
With the Stewart sample draped over top of the EluneVision, what I saw with my eyes was that the Stewart Screen was just a little bit brighter with test patterns. The EluneVision’s colour of white looked much the same and the array of saturated colours also looked the same, there was just a slight overall lightness difference. With real content, it was much more difficult to notice since there is a varied amount of colour and brightness differences all over the screen. Without the Stewart sample in front of the EluneVision, the EluneVision has phenomenal colour and grayscale reproduction that hardly differs from the Stewart. Any minor variance that is noticed on the graphs can be calibrated out by nudging the projector’s grayscale control one click. What I saw with my eyes is also what I measured. I’ve provided the data for you to see, and as you can see by the graphs and raw data, these screens are very, very close in colour and grayscale reproduction.
Image 1 StudioTek 100 Grayscale Reference
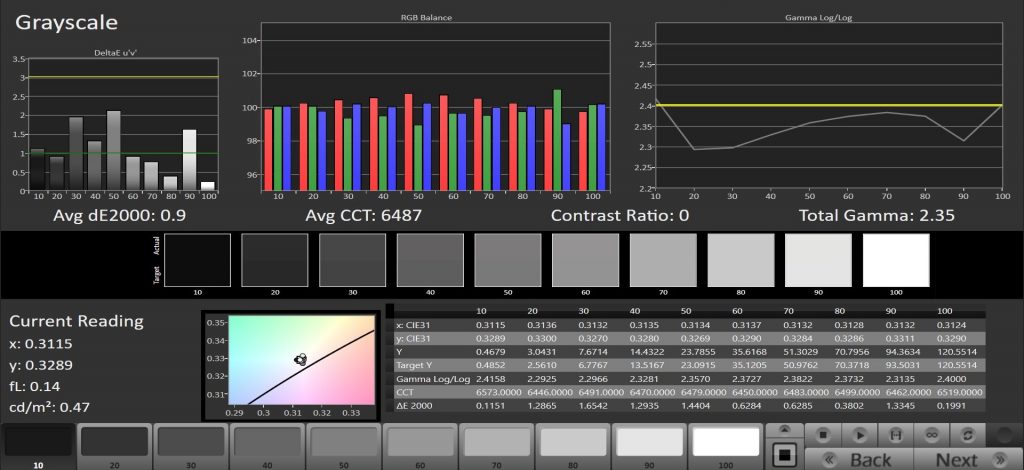
Image 2 Reference Studio 4K Grayscale Measurement
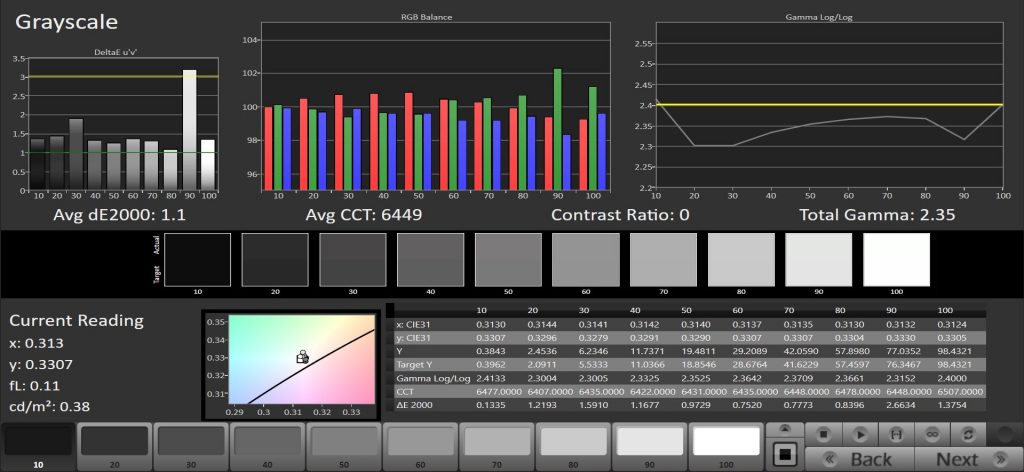
Image 3 StudioTek 100 Saturation Sweep Reference
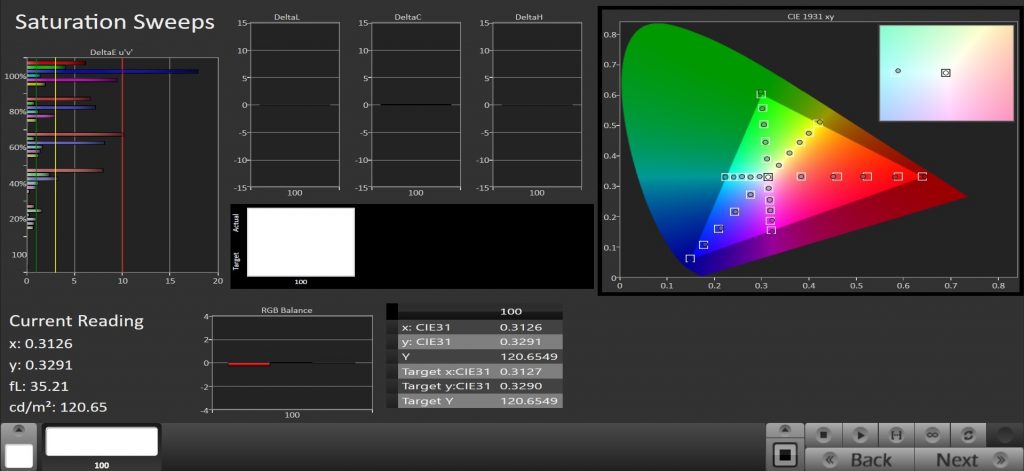
Image 4 Reference Studio 4K Saturation Sweep Measurement
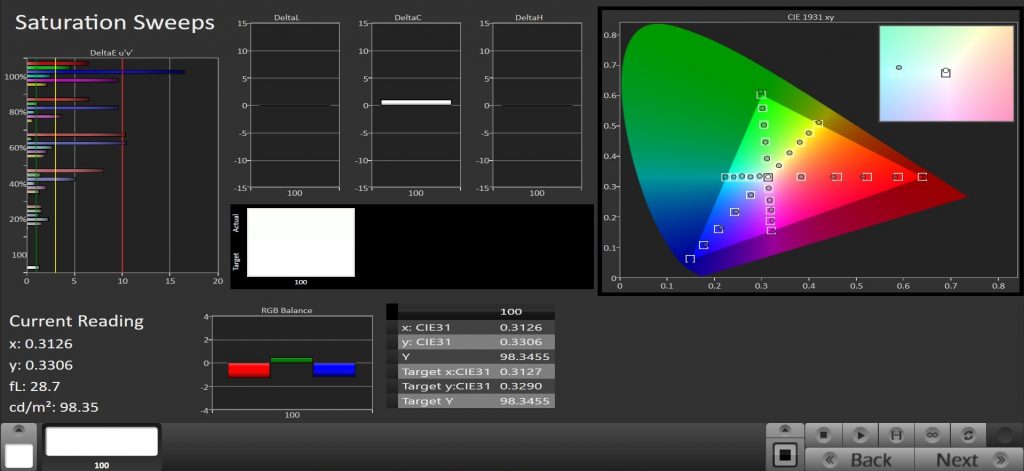
Image 5 StudioTek 100 Color Checker Reference
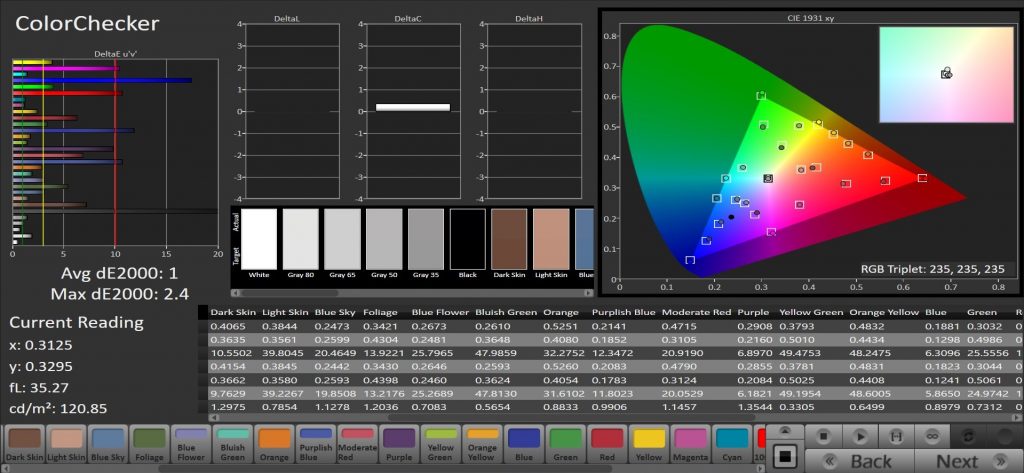
Image 6 Reference Studio 4K Color Checker Measurement
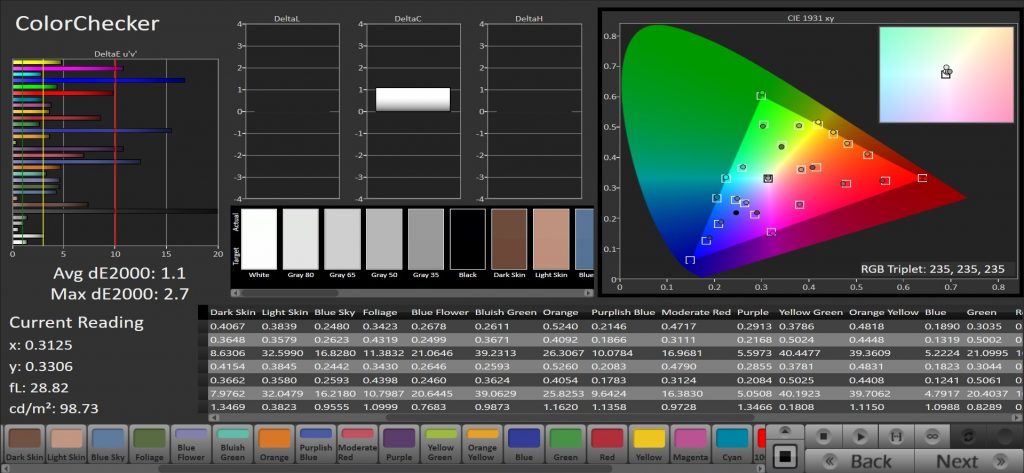
Conclusion
EluneVision’s Reference Studio 4K NanoEdge screen delivers full 4K resolution from capable projectors without altering grayscale and colour and sacrificing seating positions. At a low price of $0000.00, it easily needs to be a top contender challenging screens three times the price.
Likes:
- Excellent colour and grayscale
- No resolution loss
- No off-angle image degradation
- Sleek, thin bezel flush to the screen
- Ultra-cool full LED surround
- Options for LED colors
Would Likes:
- Revised instruction manual
- Easier assembly
I thoroughly enjoy using the EluneVision Reference Studio 4K NanoEdge screen in my theater. For those of you designing a theater around accurate video reproduction in a dark environment, you need to look at the value in this screen. For it’s price, colour accuracy is very visible at first glance and verified through calibrated testing. This screen legitimately brings movies to life right in your home when paired with a projector with the same set of goals.
You can be confident that there will be an almost perfect reproduction of the image with the Reference Studio 4K with any source material that you throw at it. DVDs, Netflix, Blu-ray, and UltraHD 4K Blu-ray will all get the same treatment from EluneVision. If you want to see your content as close to as the filmmakers wanted you to view it with a touch of modern décor with the thin bezel or just plain fun with the LED backlighting, then EluneVision Reference Studio 4K has designed a very successful product for you to consider.

